XAML Advent Calender 23日目の記事です。
Behaviorについては、アドベントカレンダ中でも数回取り上げられています。せっかくなのでもう一度取り上げてみましょう。 さて、Windows Store AppsにおけるBehaviorはWPFにおいてのそれと比べ、条件分岐ができないという制限があります。 今回はこの制限をどうにかしてみましょう。
この制限をどうにか回避するために次のようなBehaviorを考えてみました。
<local:If />
Ifです。条件分岐です。このBehaviorはIActionとして実装されていますが、子要素としてさらにIActionを受け取ることができます。
実装云々の前にまずは実例から。sliderのValueが50を超えているならtextBlockの文字色を白に。そうでないなら赤に設定します。
<ConditionalBehavior:If>
    <!-- 条件 -->
    <Conditions:GreaterThan LeftValue="{Binding Value, ElementName=slider}" RightValue="50"/>
    <!-- 成立した場合 -->
    <ConditionalBehavior:If.Then>
        <Core:ChangePropertyAction TargetObject="{Binding ElementName=textBlock}" PropertyName="Foreground">
            <Core:ChangePropertyAction.Value>
                <SolidColorBrush Color="White"/>
            </Core:ChangePropertyAction.Value>
        </Core:ChangePropertyAction>
    </ConditionalBehavior:If.Then>
    <!-- 成立しない場合 -->
    <ConditionalBehavior:If.Else>
        <Core:ChangePropertyAction TargetObject="{Binding ElementName=textBlock}" PropertyName="Foreground">
            <Core:ChangePropertyAction.Value>
                <SolidColorBrush Color="Red"/>
            </Core:ChangePropertyAction.Value>
        </Core:ChangePropertyAction>
    </ConditionalBehavior:If.Else>
</ConditionalBehavior:If>
このBehaviorはIActionが評価された際に、条件式を評価します。そして、条件式の結果がTrueを返す場合はThenに指定されたIActionを順に実行します。 同様にFalseを返す場合にはElseに指定されたIActionを順に実行します。その結果、条件式に応じたIActionを実行することができます。
これを実行した結果が次の画面です。
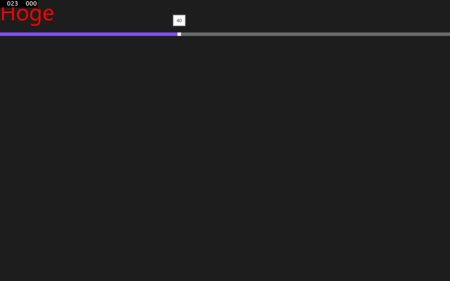

このように、Sliderの値にあわせて文字の色が変わっていることがわかります。
さらに、次のようなBehaviorも考えてみました。
<local:Switch />
Switchです。複数のCaseの中から、最初に条件式が満たされたIActionを実行します。
たとえば次のように使うことができます。
<conditionalBehavior:Switch>
    <conditionalBehavior:Case>
        <conditions:LessThan LeftValue="{Binding Value, ElementName=slider2}" RightValue="33"/>
        <conditionalBehavior:Case.Actions>
            <core:ChangePropertyAction TargetObject="{Binding ElementName=textBlock2}" PropertyName="Foreground">
                <core:ChangePropertyAction.Value>
                    <SolidColorBrush Color="Red"/>
                </core:ChangePropertyAction.Value>
            </core:ChangePropertyAction>
        </conditionalBehavior:Case.Actions>
    </conditionalBehavior:Case>
    <conditionalBehavior:Case>
        <conditions:LessThan LeftValue="{Binding Value, ElementName=slider2}" RightValue="66"/>
        <conditionalBehavior:Case.Actions>
            <core:ChangePropertyAction TargetObject="{Binding ElementName=textBlock2}" PropertyName="Foreground">
                <core:ChangePropertyAction.Value>
                    <SolidColorBrush Color="Green"/>
                </core:ChangePropertyAction.Value>
            </core:ChangePropertyAction>
        </conditionalBehavior:Case.Actions>
    </conditionalBehavior:Case>
    <conditionalBehavior:Case>
        <conditions:LessThan LeftValue="{Binding Value, ElementName=slider2}" RightValue="100"/>
        <conditionalBehavior:Case.Actions>
            <core:ChangePropertyAction TargetObject="{Binding ElementName=textBlock2}" PropertyName="Foreground">
                <core:ChangePropertyAction.Value>
                    <SolidColorBrush Color="Blue"/>
                </core:ChangePropertyAction.Value>
            </core:ChangePropertyAction>
        </conditionalBehavior:Case.Actions>
    </conditionalBehavior:Case>
</conditionalBehavior:Switch>
Sliderの値に合わせて、33未満なら赤、66未満なら緑、100未満なら青となります。


IfやSwitchの紹介はここまで。ここからは実際にVisual Studioで使ってみます。 最初にWindows Store Appsのプロジェクトを新規作成または既存のプロジェクトを開きます。 ここはみなさん各自のプロジェクトがあると思うので省略します。
プロジェクトが開いたら、ソリューションエクスプローラの参照設定を右クリックしてNuGetパッケージの管理を選択します。
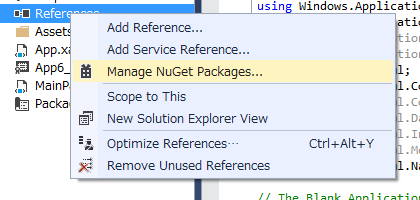
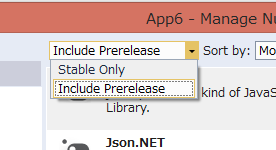
NuGetパッケージをインストールするウィンドウが開いたら、リリース前のパッケージが表示されるように設定を変更します。
そして、右上の検索ボックスにConditionalBehaviorと入力します。
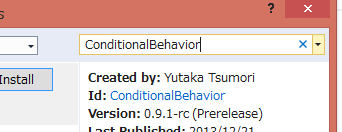
すると、ConditionalBehaviorがヒットするのでインストールしましょう。ライセンス条項がでますがMITなので適当に読み流しつつOKしてください。

これでConditionalBehaviorのインストールができました。
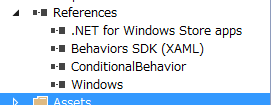
同様に次は参照の追加から、Windows→拡張とたどりBehaviors SDK (XAML)を参照に追加してください。 本当はNuGetから追加すると自動で追加できるようにできるはずなんですがなんだかうまくいきませんでした。
ここまでで参照設定はこのようになっています。
以上でBehaviorを使う準備ができました。実際の動きを試すには、MainPage.xamlなどに以下のXAMLを貼り付けてみるとよいでしょう。
<StackPanel
        xmlns:conditionalBehavior="using:Gears.ConditionalBehavior"
        xmlns:core="using:Microsoft.Xaml.Interactions.Core"
        xmlns:conditions="using:Gears.ConditionalBehavior.Conditions"
        xmlns:interactivity="using:Microsoft.Xaml.Interactivity"
    >
    <TextBlock Text="Hoge" FontSize="72" x:Name="textBlock"/>
    <Slider x:Name="slider">
        <interactivity:Interaction.Behaviors>
            <core:EventTriggerBehavior EventName="ValueChanged">
                <conditionalBehavior:If>
                    <!-- 条件 -->
                    <conditions:GreaterThan LeftValue="{Binding Value, ElementName=slider}" RightValue="50"/>
                    <!-- 成立した場合 -->
                    <conditionalBehavior:If.Then>
                        <core:ChangePropertyAction TargetObject="{Binding ElementName=textBlock}" PropertyName="Foreground">
                            <core:ChangePropertyAction.Value>
                                <SolidColorBrush Color="White"/>
                            </core:ChangePropertyAction.Value>
                        </core:ChangePropertyAction>
                    </conditionalBehavior:If.Then>
                    <!-- 成立しない場合 -->
                    <conditionalBehavior:If.Else>
                        <core:ChangePropertyAction TargetObject="{Binding ElementName=textBlock}" PropertyName="Foreground">
                            <core:ChangePropertyAction.Value>
                                <SolidColorBrush Color="Red"/>
                            </core:ChangePropertyAction.Value>
                        </core:ChangePropertyAction>
                    </conditionalBehavior:If.Else>
                </conditionalBehavior:If>
            </core:EventTriggerBehavior>
        </interactivity:Interaction.Behaviors>
    </Slider>
</StackPanel>
ここまで書いてからいうのもなんですが、Converterで事足りることも多い気がするのでなんだかあれかもしれません。