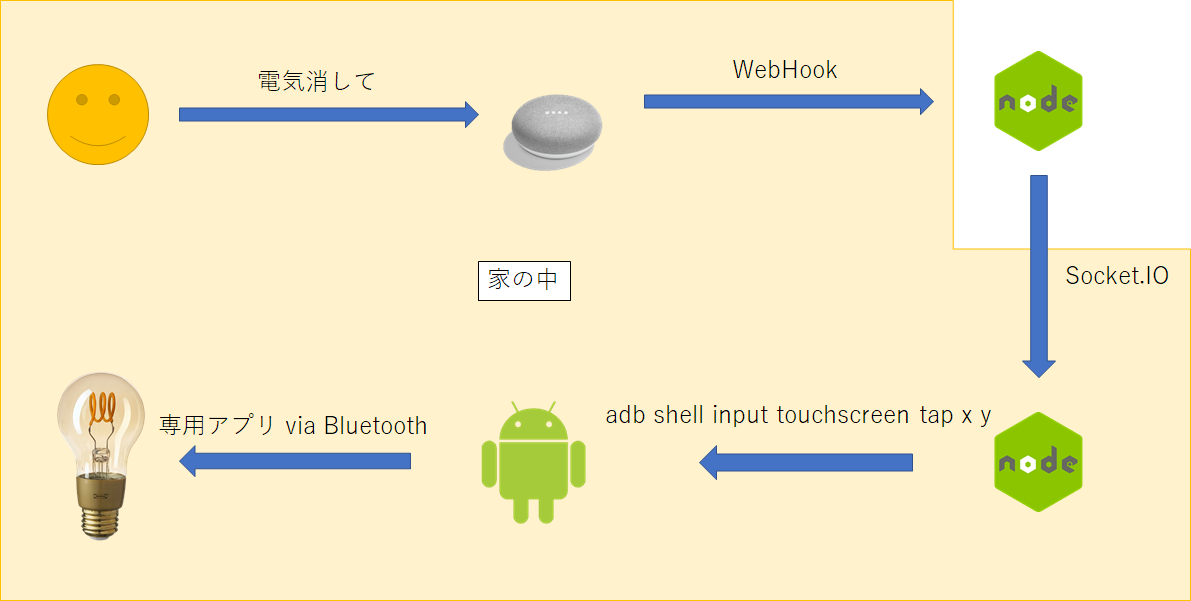
シーリングライトはPanasonicのHH-XCB1283Aというモデルを使っているのですが、このモデルはリモコンが赤外線ではなくBluetoothになっているのでスマートフォンから操作できるのでとても便利です。なんですが、Bluetoothゆえいわゆる学習リモコンは全滅だしもちろんGoogle Assistantにも対応していないのでしかたなく力押しでGoogle Assistantに対応させました。
構成
今日は天気もよく、室温が高くて寝ているのか起きているのかわからない境目を漂っているときに、今回の構成を思いつきました。

いろいろ起きた結果、USBで接続されたAndroidに対してadb shell input touchscreen tap x yでリクエストして、あらかじめ起動しておいたPanasonicの純正アプリを操作するだけ、簡単!天才!
アプリのどこを押すか決める
シーリングライトとの通信を取り持ってくれるAndroidをどうやって操作するか結構悩んだ*1結果、ADB経由でアプリを操作すれば解決やーんとなりました。 このアプリはPlay Storeで★1.9ととても微妙な評価なのですが、見た目はこんな感じです。
1と6をリクエストに合わせてadbで押してるだけ pic.twitter.com/iTdQt9h3tm
— ゆたか (@tmyt) 2019年12月27日
どうみてもiPhoneのスクショですが、Androidも見た目は全く同じ見た目です。これは1~6に電灯の状態*2をプリセットできる仕組みで、1がよく使うやつ、6が消灯、2~5が時々使うものです。とりあえず点灯と消灯ができればいいので、1と6を押すようにします。
ADB経由で任意の地点を操作するには、inputコマンドを利用すれば簡単です。たとえば、X:100, Y:100 地点をタップするには
$ adb shell input touchscreen tap 100 100
とか呼べばOKです。では今回どこを押せばいいのかというと、今回のADBを受けてくれるNextbit Robinでは次の通りでした。
| 状態 | X | Y |
|---|---|---|
| ON | 267 | 439 |
| OFF | 804 | 1162 |
この値は後で使います。
Google AssistantからのWebHookを受けるサーバを書く
次に、WebHookを受け付けるサーバを書きます。ハンドリングは、actions-to-googleっていうパッケージを使えばいいらしいので使いました。OAuth2しないといけない風だったので仕方なく空実装を作りました。ADBを中継するサーバ(後で出てきます)とはSocket.IOを使っています。
const express = require('express');
const bodyParser = require('body-parser');
const util = require('util');
const { smarthome } = require('actions-on-google');

const expressApp = express();
const app = smarthome();
const server = require('http').createServer(expressApp);
const io = require('socket.io')(server);

app.onExecute((body, headers) => {
  io.sockets.emit('execute', body);
  return {
    requestId: body.requestId,
    payload: {
      commands: [{
        ids: [ '1' ],
        status: 'SUCCESS',
        state: { on: true, online: true },
      }],
    },
  };
});
app.onQuery((body, headers) => ({
  requestId: body.requestId,
  payload: {
    devices: {
      '1': { on: true, online: true },
    },
  },
}));
app.onSync((body, headers) => ({
  requestId: body.requestId,
  payload: {
    agentUserId: '1',
    devices: [{
      id: '1',
      type: 'action.devices.types.LIGHT',
      traits: [ 'action.devices.traits.OnOff' ],
      name: {
        defaultNames: ['シーリング ライト'],
        name: 'シーリング ライト',
        nicknames: ['シーリング ライト'],
      },
      willReportState: false,
    }],
  },
}));

const assistantApp = express().use(bodyParser.json());
const oauthApp = express().use(bodyParser.urlencoded({ extended: true }));

assistantApp.post('/fulfillment', app);

oauthApp.get('/authorize', (req, res) => {
  console.log('authorize');
  const uri = `${req.query.redirect_uri}?state=${req.query.state}&code=12345678`;
  res.redirect(uri);
});
oauthApp.post('/token', (req, res) => {
  console.log('token');
  res.send({
    token_type: 'Bearer',
    access_token: '12345678' + Date.now(),
    refresh_token: '12345678',
    expires_in: 86400 * 90,
  });
});

expressApp.use('/assistant', assistantApp);
expressApp.use('/oauth', oauthApp);

io.on('connection', () => { });
server.listen(process.env.PORT);
OAuth2がまったく中身のない実装になっている、うえに、リクエストはトークンの検証していないなどとても雑です。これ、エンドポイントをたたかれると普通に動いてしまうので、皆さんはちゃんと認可を実装しましょうね。
ADBを呼び出すサーバを実装する
あとはこのサーバに接続して、ExecuteをSocket.IO経由で受け取り、接続されたAndroidに対してADBでリクエストをするサーバが必要です。これはsocket.io-clientパッケージを使えば一瞬で書けます。
const socket = require('socket.io-client')('https://ないしょだよ!!!!.example.com');
const { exec } = require('child_process');
const util = require('util');

const on = '267 439';
const off = '804 1162';

socket.on('connect', () => {
  console.log('connect');
});
socket.on('execute', data => {
  const input = data.inputs[0];
  for(const execution of input.payload.commands[0].execution){
    if(execution.command === 'action.devices.commands.OnOff'){
      const arg = execution.params.on ? on : off;
      exec(`adb.exe shell input touchscreen tap ${arg}`);
    }
  }
  console.log(util.inspect(data, true, null));
});
child_process.execでADBを呼び出しています。このプロセスは、Windows上のWSLで動くNodeJSから、Windows側のPATH環境変数に含まれているadb.exeを呼び出しているので".exe"まで含んでいます。Linuxなら不要です。
おわり
あとは、Google Assistantから呼んでもらえるようにいろいろを設定すればできあがり。
console.actions.google.com に新しいアクションを作って、WebHookサーバのURLを設定し、ADBを呼び出すサーバを実行し、Socket.IOの接続が確立できたのを確認したのちにGoogle Assistantに呼びかけます。
ねぇGoogle 電気つけて!!!!!!
きっとシーリングがつくはず…